


Let me show you how to crochet the Bunny Stitch. It is a floating crochet stitch. The stitches are executed around the post of the dc stitches below the sc row.
This stitch would be beautiful on the bottom of a little girls sweater or dress. It would look lovely on a hat. There is a small Moses Basket on the hook right now and I have already crocheted an adorable Towel Topper.

I sometimes use affiliate links in my posts. This won’t cost you anything, but will help offset the cost of yarn and other supplies needed, so that I can continue bringing you crochet patterns and craft ideas. Thank you so much for your support.

How to Crochet The Bunny Stitch:
Stitch Key:
ch = Chain
sc = Single Crochet
hdc = Half Double Crochet
dc = Double Crochet
short spike st = insert hook one row below st, pull up loop even with row, and finish the sc.
long spike st = insert hook two rows below st, pull up loop even eith row, and finish the sc.
flo = Front Loop Only
blo = Back Loop Only
join w/ = join with
slp st = Slip Stitch
skp = Skip
nxt = Next
prev. = previous
st./st’s = stitch or stitches
beg. = beginning
* * = Complete sequence between the stars, the number of times stated;
x = Times; example Repeat 2 x or 2 times; 3 x or 3 times and so on;in = example
“in nxt st” means you will be inserting the hook under the top two loops of the next stitch to complete stitch or sequence of stitches stated
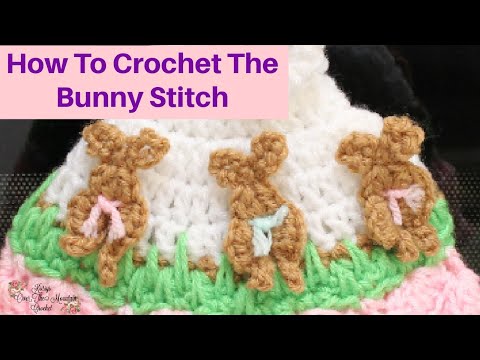
How To Crochet The Bunny Stitch
Base stitch count of 6 + 12 or 10 + 12 or 15 + 12
Use a worsted weight yarn and an H-8/5.00 mm
The bunny stitch is executed around double crochet posts, below a row or round of sc stitches.
The bunny stitch needs to be at least 6 stitches apart, with 6 stitches at the beginning and 6 stitches at the end.
You don’t have to use a hard and fast rule of 6 stitches. There can be 10 or 15 stitches between each bunny. The stitch will look best if there is a stitch count of 6 before the first bunny, and 6 stitches after the last bunny.
If you would like to try out the bunny stitch, here is a swatch pattern for you to try. The swatch below uses a stitch count of 6 + 12.
Swatch of the Bunny Stitch
Row 1:
ch 32, (beg. ch2 does not count as a stitch) dc in 3rd ch from hook and in each ch across, ch2 & turn (30 dc)
Row 2:
(beg. ch2 does not count as a stitch) dc in each st across, ch1 & turn
Place a marker every 6 stitches. (30 dc)
Row 3:
sc in 1st st, and nxt 5 st’s, move marker to the next st; bunny st; *sc in nxt 6st’s, bunny stitch* 3x; sc in last 6 st’s; (drop bunny color, and pull up grass color at the last pull through of the last stitch) ch1 and turn
Grass Stitch Rows will follow.
Row 4:
sc in beg. st and in each st across. (30 sc)
Row 5:
It is important to place a spike st into the bottom of each bunny.
sc in beg. st; *short spike sc in nxt, sc in nxt, long spike sc st in nxt, sc in nxt;* repeat between * * around; ch 1 & turn
Row 6:
*long spike sc in (1st) nxt st, sc in nxt, short spike sc st in nxt, sc in nxt;* repeat between * * around; end off and weave in all ends.
Photo Tutorial Of The Bunny Stitch
Bunny foot and body:
Turn your work just enough to complete the following stitches around the post of the dc below, going down the post, (slp st, ch3, slp st in 2nd and 3rd chain from the hook (bunny foot made) – 3 hdc around the post, sc & slp st around the post)

Bunny head and ears:
Turn your work just enough to execute the bunny head, under the top two loops of the dc that is 2 rows below the sc row. (2 hdc under the two loops, *ch6, slp st in the first ch made* slp st in the protruding third loop of the last hdc made; shove the stitches over, 2hdc under the top two loops) Bunny ears and head made.

Bunny body and foot:
Turn your work just enough so that you can complete the following stitches around the post of the next dc, going up the post. (slp st, sc, 3hdc, sc, ch3, slp st in 2nd and 1st ch, slp st)
Cross over and close the base of the bunny by executing a slp st in the beg. slp st of the bunny body.
Last Step:
sc in the stitch that is directly at the base of the bunny that was made, WHICH WILL BE THE DC THAT HOLDS THE 2nd half of the bunny body and foot.
Neck Tie:
Cut a 6″ piece of contrasting yarn, in the color of your choice. Insert your hook at the base of the neck. Pull the yarn through to the back of the head. Using your crochet hook pull the yarn through to the front.

Tie the yarn in a knot, cinching it down tight. Cut off the ends, leaving a 1/2″. Repeat for each bunny that was made.
I hope you enjoyed this tutorial! Leave me a comment below to tell me what you think about this tutorial. I would love to hear from you! It was good to have you on my side of the mountain. I hope you’ll come again soon.
God Bless,
Kris
Make sure to visit these links if you are looking for beautiful crochet patterns that will inspire you to make your world a lovely place. If you would like to see more crochet baskets or garments click the links below.
PINTEREST is a fun place and I would love it if you would follow me there.
COPYRIGHT STATEMENT
This pattern is protected by copyright© Krissys Over The Mountain Crochet 2022. Do not sell, alter or redistribute this pattern in any way or form. You have my permission to sell your finished product, but you are responsible for the finished product. No Mass Production.