

This Shamrock Towel Topper Crochet Pattern is fast and fun! The floating shamrock stitch is so fun! I love how the towel can be changed at a moment’s notice, and you can put a clean towel in the topper. The shamrock towel topper crochet pattern is below. You can purchase the ad free pdf crochet pattern at RAVELRY & ETSY.
I sometimes use affiliate links in my posts. This won’t cost you anything, but will help offset the cost of yarn and other supplies needed, so that I can continue bringing you crochet patterns and craft ideas. Thank you so much for your support.


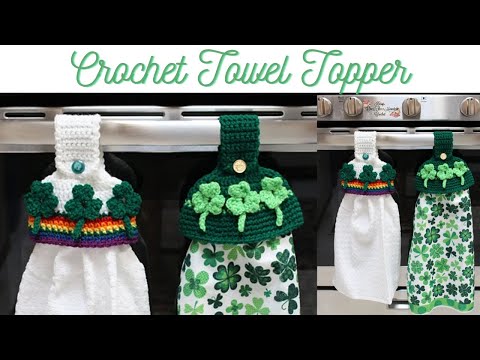
The Shamrock Towel Topper is unique.
Not only is the Floating Shamrock Stitch unique, but the towel topper is not sewn on to the towel. It can be removed, so that a clean towel can be added.


Shamrock Towel Topper Crochet Pattern
Yarn Used:
Any (4) worsted weight acrylic or cotton dishcloth yarn. I used Red Heart Super Saver from my stash.
MC= 150 yds
CC= 75 yds
Rainbow colors = approx 10 yds. of each color that is listed below.
Red
Orange
Yellow
Green
Blue
Violet
Supplies:
Any hand towel of your choosing. 1 Button of your choice (3/4″ to 1″)
Gauge:
Not applicable: Finished Measurements – 8” long with the band folded down and buttoned x 7” wide
Hook
H-8/5.00 mm
Stitch Guide:
MC = Main Color = Green or White
CC= Contrasting Color (Shamrock) = Any Shamrock color
Red
Orange
Yellow
Green
Blue
Violet
ch = Chain
sc = Single Crochet
hdc = Half Double Crochet
dc = Double Crochet
flo = Front Loop Only
blo = Back Loop Only
join w/ = join with
slp st = Slip Stitch
skp = Skip
nxt = Next
prev. = previous
st./st’s = stitch or stitches
beg. = beginning
* * = Complete sequence between the stars, the number of times stated;
x = Times; example Repeat 2 x or 2 times; 3 x or 3 times and so on;
in = example “in nxt st” means you will be inserting the hook under the top two loops of the next stitch to complete stitch or sequence of stitches stated
Special Stitch Guide:
FLOATING SHAMROCK STITCH
Click here to see a photo tutorial of the Shamrock Stitch
Leaf 1: Turn your work just enough to complete the following stitches around the post of the dc below, going down the post, (slp st, ch4, trbl, hdc, trbl, ch4, slp st) 1st leaf of the shamrock has been made.
Leaf 2: Turn your work just enough to execute the second leaf, under the top two loops of the dc round below. (Please refer to picture tutorial) (slp st, ch4, trbl, hdc, trbl, ch4, slp st) 2nd leaf has been made.
Leaf 3: Turn your work just enough so that you can complete the following stitches around the post of the next dc, going up the post, (slp st, ch4, trbl, hdc, trbl, ch4, slp st) 3rd leaf of shamrock is made.
Cross over and close the base of the shamrock by executing a slp st in the beg. slp st of the 1st leaf.
Do not end off here, proceed to make the stem
STEM: CH 6, SLP ST in 2nd CH from hook and in each remaining CH’s.
Last Step: SC IN THE STITCH THAT IS DIRECTLY AT THE BASE OF THE SHAMROCK YOU JUST MADE, WHICH WILL BE THE DC THAT HOLDS THE 3RD LEAF OF THE SHAMROCK
Shamrock Towel Topper Crochet Pattern
Beginning: Using MC, ch 6
Hanging Tab
Row 1:
2sc in 2nd ch from hook, sc in nxt 3 ch’s; 2sc in last ch; ch 1 & Turn (7 st’s)
Row 2
sc in nxt 3sc; ch1, skp st; sc in last 3 st’s; ch 1 & Turn (6 st’s & 1 ch1 sp)
Row 3:
sc in nxt 3st’s; sc in ch1 sp; sc in the last 3 st’s ch across; ch 1 & Turn; (7 st’s)
Row 4 – 22:
sc in 1st st and in each ch across; ch 1 & Turn; (7 st’s)
Ripple Edge:
Place a marker in the first and last st of Row 22. Turn slightly, ch1 & slp st in the side of the row. Continue to ch1 and slp st, down the hanging tab, executing two ch1 & slp st. sequences at the corner. Continue to ch1 & slp st across the top of the tab, executing two ch1 & slp st at the second corner. Continue to ch1 & slp st down up the last side of the hanging tab. Stop when you reach the marker, and ch2.
The rest of the pattern will be written in rounds, and the round numbers will start over.
Round 1:
2dc in the flo of each stitch across, turn your work, and execute 2dc in the blo of each stitch across; join w/slp st to beg. dc, ch 2 (28 dc)
Fold Round 1 of the towel topper in half. place a marker on the opposite side of the joining st.
chain 20, slp st in the marked stitch on the opposite side. This will be the towel hanging loop, ch2
When the towel becomes soiled and needs to be changed, just hang a clean towel over this hanging loop.
Round 2:
Make sure you are looking at the outside of the towel topper.
dc in the same st you joined the loop in, 2dc in nxt st; *dc in nxt st, 2dc in nxt st:* repeat between * * around; join w/slp st to beg. dc, ch2
Round 3 & 4:
dc in 1st st, and in each st around; drop MC and pull up CC at the join w/slp st to beg. dc; ch 1
Fold the towel topper in half. Place a marker in the center stitch. Place another marker 7 stitches to the right and left of the center stitch. You should have 3 markers.
Round 5: Shamrock Round
sc in joining st; *sc in each st across, stop at the marker, execute a sc in the marked st, execute the Shamrock Stitch starting the stitch at the marked st;* 3x; sc in remaining st’s; Drop CC and pull up MC if making the Solid Bottom, or pull up Red if making the Rainbow bottom, at the join w/slp st to beg. sc; ch1
Solid bottom version is below. Drop below the Solid Version to find the Rainbow Bottom
Round 6 – 11: Solid Bottom
sc in joining st, and in each st around; join w/slp st to beg. sc; ch1: End off at the end of Round 11 and weave in all ends. Sew button to Round 1 at the center.
Round 6 – 11: Rainbow Rounds.
Round 6 – Red: sc in joining st, and in each st around; drop red and pull up Orange at the join w/slp st to beg. sc; ch1
Round 7 – Orange: sc in joining st, and in each st around; drop orange and pull up Yellow at the join w/slp st to beg. sc; ch1
Round 8 – Yellow: sc in joining st, and in each st around; drop yellow and pull up Green at the join w/slp st to beg. sc; ch1
Round 9 – Green: sc in joining st, and in each st around; drop Green and pull up Blue at the join w/slp st to beg. sc; ch1
Round 10 – Blue: sc in joining st, and in each st around; drop Blue and pull up Violet at the join w/slp st to beg. sc; ch1
Round 11 – Violet: sc in joining st, and in each st around; join w/slp st to beg. sc; ch1: End off and weave in all ends. Sew button to the center of Round 1.
Finished Measurements – 8” long with the band folded down and buttoned x 7” wide
Will you be crocheting this Shamrock Towel Topper? I want to know! Leave me a comment below.
Make sure to visit these links if you are looking for beautiful crochet patterns that will inspire you to make your world a lovely place. If you would like to see more crochet baskets or garments click the links below.
PINTEREST is a fun place and I would love it if you would follow me there.
COPYRIGHT STATEMENT
This pattern is protected by copyright© Krissys Over The Mountain Crochet 2022. Do not sell, alter or redistribute this pattern in any way or form. You have my permission to sell your finished product, but you are responsible for the finished product. No Mass Production.