

The Lemon Farmhouse Mug Rug evokes a sense of fun and cozy! They make great gifts for a friend or loved one. Make a few for yourself too. There are two different styles of the Lemon Farmhouse Mug Rugs. I love the mug rug with the blue line the best! These mug rugs are the perfect companion to the other Lemon Farmhouse designs. You can see them all at the 2nd launch of the “Summer Celebration at Krissy’s” event. The First Launch of the Summer Celebration at Krissy’s was exciting!
I sometimes use affiliate links in my posts. This won’t cost you anything, but will help offset the cost of yarn and other supplies needed, so that I can continue bringing you crochet patterns and craft ideas. Thank you so much for your support.


Decorate your home with Lemon Farmhouse Designs.
Have fun this summer decorating your table and kitchen with these Farmhouse Lemon Designs. The Lemon Farmhouse Towel Topper is a favorite. Hanging one of these from your oven door, then putting a matching placemat, coaster or mug rug on the table is so much fun! Of course I had to design a basket for you to add to the table decor. I will have a how to video that shows you how to add a stiff fabric covered liner. It’s then perfect to hold rolls or crochet a few of these cute lemons and fill the basket with them.
Yarn Used:
Red Heart Super Saver; MC= White; CC1 Yellow; CC2 = Navy
Mug Rug -MC = White – 40 yds; CC1 = Yellow – 20 yds; CC2 = Navy – 3yds
Gauge:
Not applicable
Hook
H-8/5.00 mm
Stitch Guide:
MC = Main Color = White
CC1 = Contrasting Color = Yellow
CC2 = Contrasting Color = Navy
ch = Chain
sc = Single Crochet
join w/ = join with
slp st = Slip Stitch
skp = Skip
sp. = Space
nxt = Next
prev. = previous
st./st’s = stitch or stitches
beg. = beginning
* * = Complete sequence between the stars, the number of times stated;
x = Times; example Repeat 2 x or 2 times; 3 x or 3 times and so on;
in = example “in nxt st” means you will be inserting the hook under the top two loops of the next stitch to complete stitch or sequence of stitches stated
yo = Yarn Over
Special Stitch Guide:
mb = Mini Bean Stitch = insert hook into the stitch indicated, draw up a loop, yo, insert hook into the same st, draw up a loop, yo, draw thru all 4 loops on hook, ch 1 to close the stitch.
The mb stitch is a unique cluster stitch. When the pattern is worked in rows each row of stitches has a right and left tilt. It is easy to use the ch 1 space to execute the cluster, but it will not give you the right, left tilt.
Lemon Farmhouse Mug Rug


Beginning: Using MC, ch 24
Row 1:
sc in 2nd ch from hook and in each ch across; ch 1 & Turn (23 st’s)
Row 2 – 3:
sc in 1st st and in each ch across; ch 1 & Turn; At the end of Row 3, ch 2 instead of ch 1 & Drop MC & pull up CC1 before making the turning ch 2, Cut MC leaving approx. a 6″ tail to weave in later, or to use as fringe.(23 st’s)
Row 4:
mb in 1st st; *skp st, mb in nxt st;* repeat across; ch 1 & Turn (12 mb st’s)
Row 5 & 6:
mb in 1st mb st, and in each mb st across; ch 1 & Turn. At the end of Row 6, drop CC1 & pull up MC at the ch 1 of the last mb, Cut CC1 leaving approx. a 6″ tail, to weave in later, or to use as fringe.(12 mb st’s)
Row 7-11:
sc in 1st st, and in each st across; ch 1 & Turn. At the end of Row 11, ch 2 instead of ch 1 & Drop MC & pull up CC1 before making the turning ch 2, Cut MC leaving approx. a 6″ tail to weave in later, or to use as fringe. (23 st’s)


Row 12-14:
Repeat Rows 4-6; At the end of Row 14, drop CC1 & pull up MC at the ch 1 of the last mb.. Cut MC leaving approx. a 6″ tail to weave in later, or to use as fringe.(23 mb st’s)
Row 15-17:
sc in 1st st, and in each st across; ch 1 & Turn. Fasten off at the end of Row 17, weave in all ends. Tie fringe to the sides of the Mug Rug every two rows, mixing the colors if you choose, or matching the colors to the rows. I like a mixed look, I think a bit of navy in the fringe would be fun. (23 st’s)
Finished Measurements : 8″ w x 5″ h


Blue Stripe Mug Rug
Using H hook with MC, ch 24
Row 1:
sc in 2nd ch from hook and in each ch across; ch 1 & Turn (23 st’s)
Row 2 – 3:
sc in 1st st and in each ch across; ch 1 & Turn; At the end of Row 3, ch 2 instead of ch 1 & Drop MC & pull up CC1 before making the turning ch 2, Cut MC leaving approx. a 6″ tail to weave in later, or to use as fringe.(23 st’s)
Row 4:
mb in 1st st; *skp st, mb in nxt st;* repeat across; ch 1 & Turn (12 mb st’s)
Row 5 & 6:
mb in 1st mb st, and in each mb st across; ch 1 & Turn. At the end of Row 6, drop CC1 & pull up MC at the ch 1 of the last mb, Cut CC1 leaving approx. a 6″ tail, to weave in later, or to use as fringe.(12 mb st’s)
Row 7-8:
sc in 1st st, and in each st across; ch 1 & Turn. At the end of Row 8, drop MC & pull up CC2 at the ch 1. Cut MC leaving approx. a 6″ tail to weave in later, or to use as fringe. (23 st’s)
Row 9:
slp st in each st across, in a loose fashion, ch 1 & Turn. At the end of this row, drop CC2 & pull up MC at the ch 1. This sequence of stitches should not be tight as it will pull the mug rug out of shape and make it curl. You are now looking at the right side of the mug rug. Cut CC2 leaving approx. a 6″ tail to weave in later, or to use as fringe (23 st’s)
Follow this video that will show you how to easily execute a surface slip stitch.
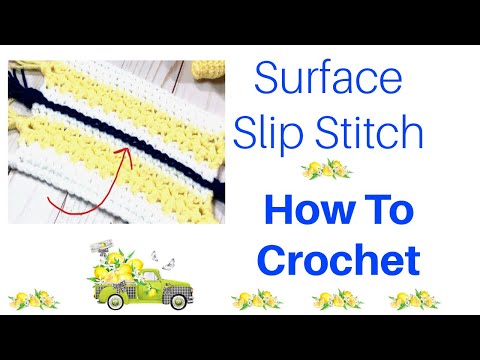
Row 10:
By pass Row 9 & execute this next row into Row 8. You can see the top two loops of Row 8 behind the slp st’s of Row 9. Insert your hook under the top two loops. sc in 1st st, and in each st across; ch 1 & turn (23 st’s)
Row 11:
sc in 1st st and in each ch across; ch 1 & Turn; At the end of Row 11, ch 2 instead of ch 1 & Drop MC & pull up CC1 before making the turning ch 2, Cut MC leaving approx. a 6″ tail to weave in later, or to use as fringe.(23 st’s)
Row 12-14:
Repeat Rows 4-6; At the end of Row 14, drop CC1 & pull up MC at the ch 1 of the last mb. Cut MC leaving approx. a 6″ tail to weave in later, or to use as fringe. (23 mb st’s)
Row 15-17:
sc in 1st st, and in each st across; ch 1 & Turn. Fasten off at the end of Row 17, weave in all ends. Tie fringe to the sides of the Mug Rug every two rows, mixing the colors if you choose, or matching the colors to the rows. I like a mixed look, I think a bit of navy, yellow and white in the fringe would be fun. (23 st’s)
Finished Measurements : 8″ w x 5″ h
Make sure to visit these links if you are looking for beautiful crochet patterns that will inspire you to make your world a lovely place. If you would like to see more crochet baskets or garments click the links below.
YOUTUBE
RAVELRY
PINTEREST is a fun place and I would love it if you would follow me there.
INSTAGRAM
COPYRIGHT STATEMENT
This pattern is protected by copyright© Krissys Over The Mountain Crochet 2021. Do not sell, alter or redistribute this pattern in any way or form. You have my permission to sell your finished product, but you are responsible for the finished product. No Mass Production.